Sunday, 3 February 2013

Knob & Tube Wiring

Knob-and-tube (K&T) wiring was an early standardized method of electrical wiring in buildings, in common use in North America from about 1880 to the 1940's. The system is considered obsolete and can be a safety hazard, although some of the fear associated with it is undeserved.


It requires two wires (normally a black one and a white one) to create a circuit. With modern wiring, these two wires (along with a ground wire) are bundled together in a single plastic sheathing. Older knob and tube wiring was installed so that the black wire and the white wire ran separately. It was installed in houses up until about 1950. Modern wiring runs directly through holes in the structural components (such as floor joists). Knob and tube wiring used protective ceramic tubes placed in the holes to prevent the wire from chafing against the woodwork. Modern wiring uses staples to hold the wiring against structural members. 

Knob and tube wiring used more elaborate ceramic knobs to clamp the wire to the structural member. Connections between modern wires are completed within enclosed junction boxes. Knob and tube wiring had visible connections. The wires were spliced and soldered together and then wrapped with electrical tape. Ceramic knobs were used to secure the wires so that anyone inadvertently tugging on the wire would not be tugging on the electrical connection. Modern wiring is typically #14 gauge copper wire and capable of handling 15 amps. Knob and tube wiring is often #12 gauge copper wire and can handle 20 amps. Note: Even though some knob and tube wiring is capable of handling 20 amps, we suggest that it be protected by 15 amp fuses because, in all likelihood, some modern #14 gauge wire may be connected to the older #12 gauge wiring.

From the above description, it becomes pretty obvious that knob and tube wiring is not necessarily dangerous. Knob and tube wiring which was installed properly, and has not been abused, can provide many more years of service. The biggest problem with knob and tube wiring has nothing to do with the original wiring. It has everything to do with what has happened after the fact.

Most old houses do not have as many electrical circuits as new houses. If a circuit became overtaxed and 15 amp fuses were constantly blowing, some ill informed home owners would put in 25 or 30 amp fuses to “solve” the problem. Allowing 25 or 30 amps to flow through a wire which was not intended to handle that much electricity, causes the wire to overheat. This can cause the wire and the insulation to become brittle. Some home owners also decided to add additional outlets in the house and tie the new outlets into the old wiring. Instead of making proper connections which are soldered and appropriately protected, many home owners did their own sub-standard work. They would get out the pliers and a paring knife and whittle away at the wires until a connection was made. Instead of wrapping the connection with proper electrical tape, they used hockey tape, masking tape, scotch tape or even band-aids. It is wiring that has been abused that is potentially dangerous. Knob and tube wiring, on its own, is not inherently a problem. Some would argue that knob and tube wiring does not have a ground conductor. We would remind them that even modern wiring installed between 1950 and 1960 does not have a ground conductor.

A ground conductor is necessary if you are plugging in appliances that have a 3-prong plug. If however, the knob and tube wiring is restricted to bedrooms, living room, dining room, et cetera, this creates no special hazard. Plugging a two prong lamp, TV, or clock into an old two prong outlet is just as safe as plugging them into a grounded outlet.

K&T Wiring and Insurance:

Many insurance companies refuse to insure houses that have knob-and-tube wiring due to the risk of fire. Exceptions are sometimes made for houses where an electrical contractor has deemed the system to be safe.

Advice for those with K&T wiring:

  • Have the system evaluated by a qualified electrician. Only an expert can confirm that the system was installed and modified correctly.
  • Do not run an excessive amount of appliances in the home, as this can cause a fire. 
  • Where the wiring is brittle or cracked, it should be replaced. Proper maintenance is crucial. 
  • K&T wiring should not be used in kitchens, bathrooms, laundry rooms or outdoors. Wiring must be grounded in order to be used safely in these locations. 
  • Rewiring a house can take weeks and cost thousands of dollars, but unsafe wiring can cause fires, complicate estate transactions, and make insurers skittish. 
  • Homeowners should carefully consider their options before deciding whether to rewire their house. 
  • The homeowner or an electrician should carefully remove any insulation that is found surrounding K&T wires. 
  • Prospective home buyers should get an estimate of the cost of replacing K&T wiring. They can use this amount to negotiate a cheaper price for the house. 

In summary, knob-and-tube wiring is likely to be a safety hazard due to improper modifications and the addition of building insulation. Inspectors need to be wary of this old system and be prepared to inform their clients about its potential dangers. 

Saturday, 26 January 2013

Synthetic Stucco (EIFS)

EIFS stands for Exterior Insulating and Finishing Systems. It is sometimes referred to as Synthetic Stucco. Its use increased sharply in the 1990s. In North America about 300, 000 homes have an EIFS exterior.

We care because EIFS has been connected to concealed rot in wall cavities.

What Exactly Is It?

There are many different systems offered by various manufacturers, but in general EIFS wall systems consist of a wood frame wall covered with a sheathing such as plywood, or even gypsum board. Plastic foam insulation boards are glued or fastened to the sheathing. A 1/16- to 1/4- inch-thick base coat is troweled on to the insulation. A glass fiber reinforcing mesh is imbedded in the base coat. Finally, a finished coat is sprayed, troweled or rolled on. This finish coat provides the color and texture.

Many installations have no building paper or housewrap behind the stucco to act as a backup material.

What Is Happening

Rain water appears to be getting into the wall systems through imperfections in the stucco. These include joints around windows and doors and penetrations from railings, wiring, plumbing, vents, etc. Once water gets behind the system it gets trapped, leading to mold, mildew and rot of the sheathing, studs, flooring and other framing members. EIFS houses often look good until sections of the wall are removed revealing concealed damage. The damage can take place within the first few years of the home's life.

As most of the damage has been found in houses in coastal areas, some have suggested that condensation is a problem; however, since the most severe damage seems to show up around wall penetrations, condensation does not appear to be the culprit. The worst damage is often found below and beside windows.

Solutions

There is little that can be done on existing systems short of re-siding or paying fanatical attention to keeping the water out. Caulking and flashing maintenance should be a high priority for people with synthetic stucco houses.

In the very newest installations, contractors are using building paper or housewrap behind the insulation to protect the sheathing. In addition, the newest installations are designed with a drainage system behind the insulation to allow any water which does get in, to drain out. This is not unlike the drainage system found in a brick veneer home. These improvements should work but only if they are well constructed.

So far we know that areas of high rain fall, and particularly areas with rain accompanied by wind, result in houses with the most damage. Homes which have no roof overhang or very small overhang or many penetrations through the wall systems are also at risk.

Unfortunately, a visual inspection cannot tell the whole story, and until invasive testing becomes standardized and sufficient data becomes available for our area, concealed damage in synthetic stucco houses will remain a question mark.

Friday, 18 January 2013

Carbon Monoxide


WHAT IS CARBON MONOXIDE?

CO is a colorless, odorless, tasteless gas.
It is a by-product of incomplete combustion (un-burned fuel such as gas, oil, wood, etc.)
Low concentrations of CO can go undetected and can contribute to ongoing, unidentified illnesses. At high concentrations, it can be deadly.

WHY IS IT DANGEROUS?

If there is CO in the air you breath, it will enter your blood system the same way oxygen does, through your lungs. The CO displaces the oxygen in your blood, depriving your body of oxygen. When the CO displaces enough oxygen, you suffocate.

WHAT ARE THE SYMPTOMS?

· Confusion
· Cardiac Problems
· Brain Damage
· Severe Headaches
· Breathing Difficulties
· Dizziness
· Death

WHAT CAN PRODUCE CO IN OUR HOMES?

Anything that burns fuel or generates combustion gases including:

· Gas Stoves
· Fireplaces
· Automobiles
· BBQ
· Furnaces
· Ranges
· Boilers
· Space Heaters

Solid fuels, such as wood, always produce carbon monoxide when they are burned. Gas and liquid fuels may produce no CO or very little.

WHAT ARE THE MOST COMMON SOURCES OF CARBON MONOXIDE?

1. Automobile exhaust in attached garages

This is responsible for 60% of all CO alarms. People who warm their cars up in the garage are trapping CO inside the garage. The CO can find its way into the home.


2. Gas cooking appliances

Reported to account for 20% of CO alarms.
May be a result of a misused, poorly
maintained, poorly installed, or unvented
cooking appliance.


3. Poor draft/venting for fuel burning appliances -

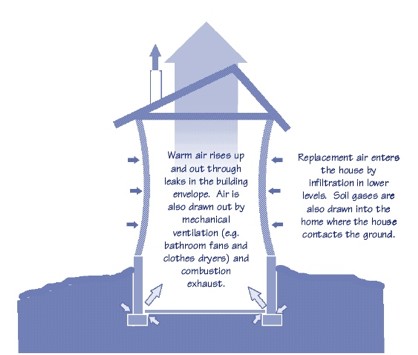
This is one of the most common and serious causes for CO build up and has been reported to account for up to 19% of CO alarms. The products of combustion are not being safely expelled to the exterior. This could be due to venting problems, such as blocked chimney flues or inadequate venting for appliances or fireplaces. Other problems include poor installation and negative air pressure in the house, causing backdrafting, often due to exhaust fans.

Other problems include:

Poor combustion at furnace

Inadequate combustion air to the furnace can result in incomplete combustion. If the furnace has a cracked heat exchanger, it is possible to get CO into the circulating air. It is also imperative that we do not deprive our heating equipment and fuel burning appliances of air; especially in air-tight homes where running exhaust fans can result in a shortage of combustion air. Combustion air is essential for safe operation of furnaces, water heaters, and other fuel burning equipment.

Leakage -

A leak in a chimney or flue pipe.


Ventilation -

Barbecues or gasoline powered equipment operating in a attached garage, basement,
or enclosed area.

Are there more problems with carbon monoxide today than 30 years ago?

Yes, due to -
More energy-efficient, air-tight homes
Less natural ventilation

How can I guard against carbon monoxide poisoning?

The first line of defense is to have your home heating systems, fuel burning appliances, flues and chimneys checked and/or cleaned annually.

CONCLUSIONS
CO detectors are designed to protect the average healthy human from death or serious injury under the current standards; however - People who are more susceptible cannot depend on these devices for total protection. In this case, more sensitive CO detecting equipment should be used.
Several groups are working with UL to improve the standards. October 99 revisions have already been drafted. There is room for improvement by imposing stricter standards as well as technological development.
It is critical that people understand the dangers of CO and that the people who investigate it are properly trained and are using CO testing equipment properly.

Where to install a CO detector?
One or more CO detectors in accordance with the manufacturer's recommendations. Usually one per floor.
Maintain and test regularly as instructed by the manufacturer.

Cheers to Carson Dunlop for providing us with this valuable information! For more information please contact your leading Toronto home inspection firm.

Thursday, 3 January 2013

Radon Gas

Radon is a cancer-causing, radioactive gas. 

You cannot see, smell or taste radon. But it still may be a problem in your home. When you breathe air containing radon, you increase your risk of getting lung cancer. In fact, the Surgeon General of the United States has warned that radon is the second leading cause of lung cancer in the United States today. If you smoke and your home has high radon levels, your risk of lung cancer is especially high. Radon is a radioactive gas that has been found in homes all over the United States & Canada. It comes from the natural breakdown of uranium in soil, rock and water, and gets into the air you breathe. Radon typically moves up through the ground to the air above, and into your home through cracks and other holes in the foundation. Radon can also enter your home through well water. Your home can trap radon inside. Any home can have a radon problem, including new and old homes, well-sealed and drafty homes, and homes with or without basements. In fact, you and your family are most likely to get your greatest radiation exposure at home. That is where you spend most of your time.

Nearly one out of every 15 homes in the United States is estimated to have an elevated radon level (4 pCi/L or more). Elevated levels of radon gas have been found in homes in your state.

The EPA Recommends:

  • If you are buying a home or selling your home, have it tested for radon.
  • For a new home, ask if radon-resistant construction features were used and if the home has been tested.
  • Fix the home if the radon level is 4 picoCuries per liter (pCi/L) or higher. 
  • Radon levels less than 4 pCi/L still pose a risk, and in many cases, may be reduced. 
  • Take steps to prevent device interference when conducting a radon test.

Test for Radon

Having your home tested is the best way to find out if you have high radon levels. The EPA and the Surgeon General recommend testing all homes below the third floor for radon. If you find that you have high radon levels, there are ways to fix a radon problem. Even very high levels can be reduced to acceptable levels.

Selling your Home?

The EPA recommends that you test your home before putting it on the market and, if necessary, lower your radon levels. Save the test results and all information you have about steps that were taken to fix any problems. This could be a positive selling point.

Buying a Home?

The EPA recommends that you know what the indoor radon level is in any home you are considering buying. Ask the seller for their radon test results. If the home has a radon-reduction system, ask the seller for information they have about the system. If the home has not yet been tested, you should have the house tested.

If you are having a new home built, there are features that can be incorporated into your home during construction to reduce radon levels.

These radon testing guidelines have been developed specifically to deal with the time-sensitive nature of home purchases and sales, and the potential for radon device interference. These guidelines are slightly different from the guidelines in other EPA publications which provide radon testing and reduction information for non-real estate situations.

This guide recommends three short-term testing options for real estate transactions. The EPA also recommends testing a home in the lowest level which is currently suitable for occupancy, since a buyer may choose to live in a lower area of the home than that used by the seller.

Radon Mitigation System.

Contact us for more information.

Friday, 21 December 2012

Truss Uplift

An Uplifting Experience

Truss uplift has nothing to do with plastic surgery or under- garments. It is a phenomenon common in homes built with roof trusses as opposed to rafters. If a house suffers from truss uplift, the top floor ceilings literally lift off the interior walls in the winter. They drop back down in the summer. Needless to say, this is a tad disconcerting to the homeowner. At first glance, one might assume that the floors have settled. Actually the ceiling has gone up - sometimes creating a gap of as much as two inches where interior walls meet the ceilings.

What is a Truss? Trusses are prefabricated structural assemblies which hold up the roof and the top floor ceilings. Trusses tend to be a stronger lighter and less expensive approach to roof framing.

Trusses are strong because they make use of the most efficient geometric shape we know of - the triangle. Trusses are a series of triangles fastened together with gusset plates. The outside members of a truss are called chords while the inner pieces are known as webs.


Why Truss Uplift?

Houses have changed over the years. Attics of newer houses have lots of insulation and ventilation. They also have roof trusses instead of rafters and ceiling joists. The bottom chord of a truss is buried below a deep blanket of insulation. Even on the coldest days the bottom chord is nice and warm. The top chords however, are above the insulation and get very cold in a well ventilated attic.

While the bottom chord is warm and is drying out, the top chords are doing just the opposite. The cold winter air has very high relative humidity. The top chords absorb moisture from the air causing them to elongate.

With the top chords growing and the bottom chord shrinking, the truss arches up in the middle causing the ceilings to lift off the walls. In the summer, the cycle reverses itself.

What Is The Problem? 

No problem really - from a structural point of view. But cosmetically it's another story. No one has yet solved the problem, but some builders mask it by securing the ceiling drywall to the top of the walls and not to the trusses for a distance of 18 inches away from the walls. The drywall flexes and stays fastened to the walls while the trusses lift above it.

Others use a decorative molding where the walls meet the ceilings. They fasten the moldings to the ceilings but not to the walls. As the ceilings move up, the moldings go with them hiding the gap.

One little tip to remember. If you're redecorating, always do it in the winter when the ceiling is at its highest point. Otherwise you'll have a stripe around the room below the molding next winter!

House CSI - Quality Home Inspections by Inspectors who have Actually Built Homes!

Please contact us for more information! 

Wednesday, 17 October 2012

Renovation Consultations

Martyn Boyce supervised and directed home renovations in Toronto for over 20 years. Needless to say, he has the necessary knowledge and experience to advise you on any of your future renovation decisions. One of the greatest benefits of the renovation consultation is that we can inform you of exactly how to go about your renovation and if your ideas are reasonable given the existing structure. Our objective is to help you understand how to keep costs down, but ultimately how to make you dreams come alive.

Here is a quick break down of services regarding Renovation Consultations. This is a unique service that we offer and may be of interest to you.


Pre-Renovation Review - Please contact us for a quote.
The pre-renovation inspection is an initial review consultation to assess the suitability of property and structure with the respect to the work planned by home owner. Usually takes less than 3 hours and does not include a written report.

Pre-Renovation Consultation - Please contact us for a quote.
(With existing plans)
Review of plans, detailed structural analysis, and recommendations for improvements. This will include a written report.

Pre-Renovation Consultation - Please contact us for a quote.
(Without existing plans)
This includes the ‘Pre-renovation review’ as the initial meeting. It is then followed by Martyn providing a preliminary outline drawing of the existing house and options for the planned renovation design.

This can also be followed by detailed drawings, scope of work, specifications, & permits required. These can only be quoted after the initial consultations.

Renovation in Progress Consultation - Please contact us for a quote.
For those that may be having issues with a renovation in progress. We can provide an independent unbiased assessment of your project status.

For more information contact Martyn Boyce P.Eng at House CSI.


Monday, 21 May 2012

GFCI Outlets


What is a GFCI? 

A ground-fault circuit interrupter, or GFCI, is a device used in electrical wiring to disconnect a circuit when unbalanced current is detected between an energized conductor and a neutral return conductor. Such an imbalance is sometimes caused by current "leaking" through a person who is simultaneously in contact with a ground and an energized part of the circuit, which could result in lethal shock. GFCIs are designed to provide protection in such a situation, unlike standard circuit breakers, which guard against overloads, short circuits and ground faults.

It is estimated that about 300 deaths by electrocution occur every year, so the use of GFCIs has been adopted in new construction, and recommended as an upgrade in older construction, in order to mitigate the possibility of injury or fatality from electric shock.

History

The first high-sensitivity system for detecting current leaking to ground was developed by Henri Rubin in 1955 for use in South African mines. This cold-cathode system had a tripping sensitivity of 250 mA (milliamperes), and was soon followed by an upgraded design that allowed for adjustable trip-sensitivity from 12.5 to 17.5 mA. The extremely rapid tripping after earth leakage-detection caused the circuit to de-energize before electric shock could drive a person's heart into ventricular fibrillation, which is usually the specific cause of death attributed to electric shock.

Charles Dalziel first developed a transistorized version of the ground-fault circuit interrupter in 1961. Through the 1970s, most GFCIs were of the circuit-breaker type. This version of the GFCI was prone to frequent false trips due to poor alternating-current characteristics of 120-volt insulations. Especially in circuits with long cable runs, current leaking along the conductors’ insulation could be high enough that breakers tended to trip at the slightest imbalance.

Since the early 1980s, ground-fault circuit interrupters have been built into outlet receptacles, and advances in design in both receptacle and breaker types have improved reliability while reducing instances of "false trips," known as nuisance-tripping.

Testing Receptacle-Type GFCIs

Receptacle-type GFCIs are currently designed to allow for safe and easy testing that can be performed without any professional or technical knowledge of electricity. GFCIs should be tested right after installation to make sure they are working properly and protecting the circuit. They should also be tested once a month to make sure they are working properly and are providing protection from fatal shock.

To test the receptacle GFCI, first plug a nightlight or lamp into the outlet. The light should be on. Then press the "TEST" button on the GFCI. The "RESET" button should pop out, and the light should turn off.

If the "RESET" button pops out but the light does not turn off, the GFCI has been improperly wired. Contact an electrician to correct the wiring errors.

If the "RESET" button does not pop out, the GFCI is defective and should be replaced.

If the GFCI is functioning properly and the lamp turns off, press the "RESET" button to restore power to the outlet.

Hire an InterNACHI inspector. InterNACHI inspectors must pass rigorous safety training and are knowledgeable in the ways to reduce the likelihood of electrocution.