Showing posts with label Certified Home Inspection. Show all posts

Thursday, 3 January 2013

Radon Gas

Radon is a cancer-causing, radioactive gas. 

You cannot see, smell or taste radon. But it still may be a problem in your home. When you breathe air containing radon, you increase your risk of getting lung cancer. In fact, the Surgeon General of the United States has warned that radon is the second leading cause of lung cancer in the United States today. If you smoke and your home has high radon levels, your risk of lung cancer is especially high. Radon is a radioactive gas that has been found in homes all over the United States & Canada. It comes from the natural breakdown of uranium in soil, rock and water, and gets into the air you breathe. Radon typically moves up through the ground to the air above, and into your home through cracks and other holes in the foundation. Radon can also enter your home through well water. Your home can trap radon inside. Any home can have a radon problem, including new and old homes, well-sealed and drafty homes, and homes with or without basements. In fact, you and your family are most likely to get your greatest radiation exposure at home. That is where you spend most of your time.

Nearly one out of every 15 homes in the United States is estimated to have an elevated radon level (4 pCi/L or more). Elevated levels of radon gas have been found in homes in your state.

The EPA Recommends:

  • If you are buying a home or selling your home, have it tested for radon.
  • For a new home, ask if radon-resistant construction features were used and if the home has been tested.
  • Fix the home if the radon level is 4 picoCuries per liter (pCi/L) or higher. 
  • Radon levels less than 4 pCi/L still pose a risk, and in many cases, may be reduced. 
  • Take steps to prevent device interference when conducting a radon test.

Test for Radon

Having your home tested is the best way to find out if you have high radon levels. The EPA and the Surgeon General recommend testing all homes below the third floor for radon. If you find that you have high radon levels, there are ways to fix a radon problem. Even very high levels can be reduced to acceptable levels.

Selling your Home?

The EPA recommends that you test your home before putting it on the market and, if necessary, lower your radon levels. Save the test results and all information you have about steps that were taken to fix any problems. This could be a positive selling point.

Buying a Home?

The EPA recommends that you know what the indoor radon level is in any home you are considering buying. Ask the seller for their radon test results. If the home has a radon-reduction system, ask the seller for information they have about the system. If the home has not yet been tested, you should have the house tested.

If you are having a new home built, there are features that can be incorporated into your home during construction to reduce radon levels.

These radon testing guidelines have been developed specifically to deal with the time-sensitive nature of home purchases and sales, and the potential for radon device interference. These guidelines are slightly different from the guidelines in other EPA publications which provide radon testing and reduction information for non-real estate situations.

This guide recommends three short-term testing options for real estate transactions. The EPA also recommends testing a home in the lowest level which is currently suitable for occupancy, since a buyer may choose to live in a lower area of the home than that used by the seller.
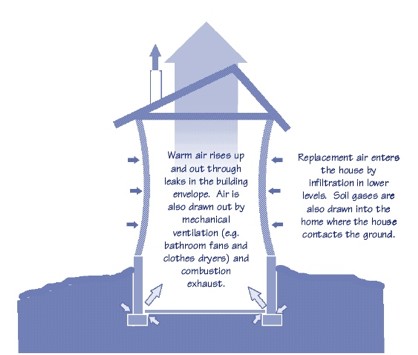
Radon Mitigation System.

Contact us for more information.

Monday, 2 April 2012

Find better ways to heat and cool your house

As much as half of the energy used in homes goes toward heating and cooling. The following are a few ways that energy bills can be reduced through adjustments to the heating and cooling systems: 

  • Install a ceiling fan. Ceiling fans can be used in place of air conditioners, which require a large amount of energy. 
  • Periodically replace air filters in air conditioners and heaters. 
  • Set thermostats to an appropriate temperature. Specifically, they should be turned down at night and when no one is home. In most homes, about 2% of the heating bill will be saved for each degree that the thermostat is lowered for at least eight hours each day. Turning down the thermostat from 75° F to 70° F, for example, saves about 10% on heating costs. 
  • Install a programmable thermostat. A programmable thermostat saves money by allowing heating and cooling appliances to be automatically turned down during times that no one is home and at night. Programmable thermostats contain no mercury and, in some climate zones, can save up to $150 per year in energy costs. 
  • Install a wood stove or a pellet stove. These are more efficient sources of heat than furnaces. 
  • At night, curtains drawn over windows will better insulate the room.

Sunday, 1 April 2012

Home Maintenance!

There are so many home maintenance and repair items that are important; it can be confusing trying to establish which are the most critical. To simplify things, we have compiled a short list of our favorites. These are by no means all-inclusive, nor do they replace any of the information in a home inspection report. They should, however, help you get started on the right foot. Remember, any items marked as priority or safety issues on your home inspection report need immediate attention.

One-Time Tasks:
  •  Install smoke detectors as necessary (usually one on each floor of the home, near any sleeping areas). Install carbon monoxide detectors, according to manufacturer’s recommendations. 
  • Make any electrical improvements recommended in the home inspection report. 
  • Remove and wood/soil contact to prevent rot and insect damage. 
  • Change the locks on all doors. Use a dead bolt for better security and to minimize insurance costs.
  • Correct trip hazards such as broker or uneven walks and driveways, loose or torn carpet or uneven flooring. 
  • Correct unsafe stairways and landings. (Railings missing, loose, too low, etc.) 
  • Have all chimneys inspected before operating any of the chimney exhausting appliances. 
  • Locate and mark the shut offs for the heating, electrical and plumbing systems. 
  • Label the circuits on the electrical panel. 
  • If there is a septic system, have the tank pumped and inspected. If the house is on a private water supply, set up a regular testing procedure for checking water quality. 


Regular Maintenance Items:

  • Clean the gutters in the spring and fall. 
  • Check for damaged roofing and flashing materials twice a year. 
  • Cut back trees and shrubs for the house walls, roof and air conditioning system as needed. 
  • Clean the tracks on horizontal siding windows annually, and ensure the drain holes are clear. 
  • Test ground fault circuit interrupters (GFCI), carbon monoxide detectors and smoke detectors using the test button, monthly. 
  • Service the furnace or boiler yearly. 
  • Check furnace filters, humidifiers, and electronic air cleaners monthly. 
  • Check the bathtub and shower caulking monthly and improve promptly if necessary. 
  • Shut off outdoor water faucets in the fall to prevent freezing over the winter. 
  • Check garage door safety mechanisms monthly. 
  • Check attics for evidence of leaks and condensation twice a year. 
  • Check attic vents. Make sure vents are not obstructed. 
House CSI

Saturday, 17 March 2012

Inspecting your Air Conditioning System

A building's central air-conditioning system must be periodically inspected and maintained in order to function properly. While an annual inspection performed by a trained professional is recommended, homeowners can do a lot of the work themselves by following the tips offered in this guide.

Clean the Exterior Condenser Unit and Components

The exterior condenser unit is the large box located on the side of the building that is designed to push heat from the inside of the building to the outdoors. Inside of the box are coils of pipe that are surrounded by thousands of thin metal "fins" that allow the coils more surface area to exchange heat. Follow these tips when cleaning the exterior condenser unit and its inner components -- after turning off power to the unit!
  • Remove any leaves, spider webs and other debris from the unit's exterior. 
  • Trim foliage back several feet from the unit to ensure proper air flow. 
  • Remove the cover grille to clean any debris from the unit's interior. A garden hose can be helpful for this task.  
  • Straighten any bent fins with a tool called a fin comb. 
  • Add lubricating oil to the motor. 
  • Check your owner’s manual for specific instructions. 
  • Clean the evaporator coil and condenser coil at least once a year. When they collect dirt, they may not function properly. 

Inspect the Condensate Drain Line

Condensate drain lines collect condensed water and drain it away from the unit. They are located on the side of the inside fan unit. Sometimes there are two drain lines—a primary drain line that’s built into the unit, and a secondary drain line that can drain if the first line becomes blocked. Homeowners can inspect the drain line by using the following tips, which take very little time and require no specialized tools:
Inspect the drain line for obstructions, such as algae and debris. If the line becomes blocked, water will back up into the drain pan and overflow, potentially causing a safety hazard or water damage to your home.
Make sure the hoses are secured and fit properly.

Clean the Air Filter

Air filters remove pollen, dust and other particles that would otherwise circulate indoors. Most filters are typically rectangular in shape and about 20 inches by 16 inches, and about 1 inch thick. They slide into the main ductwork near the inside fan unit. The filter should be periodically washed or replaced, depending on the manufacturer’s instructions. A dirty air filter will not only degrade indoor air quality, but it will also strain the motor to work harder to move air through it, increasing energy costs and reducing energy efficiency. The filter should be replaced monthly during heavy use during the cooling seasons. You may need to change the filter more often if the air conditioner is in constant use, if building occupants have respiratory problems,if you have pets with fur, or if dusty conditions are present.

Cover the Exterior Unit

When the cooling season is over, you should cover the exterior condenser unit in preparation for winter. If it isn’t being used, why expose it to the elements? This measure will prevent ice, leaves and dirt from entering the unit, which can harm components and require additional maintenance in the spring. A cover can be purchased, or you can make one yourself by taping together plastic trash bags. Be sure to turn the unit off before covering it.

Close the Air-Distribution Registers

Air-distribution registers are duct openings in ceilings, walls and floors where cold air enters the room. They should be closed after the cooling season ends in order to keep warm air from back-flowing out of the room during the warming season. Pests and dust will also be unable to enter the ducts during the winter if the registers are closed. These vents typically can be opened or closed with an adjacent lever or wheel. Remember to open the registers in the spring before the cooling season starts. Also, make sure they are not blocked by drapes, carpeting or furniture.

In addition, homeowners should practice the following strategies in order to keep their central air conditioning systems running properly:
  • Have the air-conditioning system inspected by a professional each year before the start of the cooling season. 
  • Reduce stress on the air conditioning system by enhancing your home’s energy efficiency. Switch from incandescent lights to compact fluorescent, for instance, which produce less heat. 

In summary, any homeowner can perform periodic inspections and maintenance to their home's central air-conditioning system.

Wednesday, 7 March 2012

Efflorescence

Efflorescence is an accumulation of minerals and salts on masonry surfaces, such as brick, cement, and sometimes stone. Efflorescence itself is not dangerous; it indicates the presence of excess water, which can lead to more serious structural and health issues.


How Efflorescence Forms

The earth contains natural salts that are present in the raw materials that make up masonry products, such as concrete, asphalt and stucco. These salts remain trapped within masonry in solid form until they are dissolved into water, which usually makes its way into the material through small pores. Water can originate from rain, sprinklers, household leaks, or any number of other places. Cold, dry air will draw this liquid back out of the material where it evaporates, depositing the salt as a white crystalline growth on the surface. Efflorescence typically forms during cold, dry weather shortly after it has rained and moisture has entered the masonry. It can occur year-round, but it is most likely to form during the winter due to low temperatures.

As with mould, the appearance of efflorescence varies greatly. It can be powdery, it can have sharp edges and be easy to spot, or it can have indistinct edges. It can cover a large area as a fine dust, or form large individual crystals. Its appearance depends partly on the type of salt from which it is composed, but humidity also plays a role in this determination. In exceptionally dry climates, water can evaporate before it even reaches the surface, in which case the salt will accumulate unseen beneath the surface. In humid conditions, moisture may take a long time to evaporate, allowing the slow growth of “whispers” projecting from the surface.


Inspectors should note the presence of efflorescence in their inspection reports because it generally occurs where there is excess moisture, a condition that also encourages the growth of mould. An exception can be made during the first few years of a building’s construction when efflorescence will appear as a result of moisture locked within the masonry in a process called “new building bloom.” This moisture comes from water added during the manufacturing or mixing process that will undoubtedly contribute to efflorescence. This type of efflorescence will appear all over the masonry material and will continue to accumulate until the initial water supply is exhausted, which can take up to a year. Efflorescence that appears locally and after the “new building bloom” is over is a symptom of excess moisture that can be problematic. The source of this moisture should be determined and corrected.

In summary, efflorescence is a harmless yet unsightly accumulation of salts on masonry surfaces. Its presence indicates excess water, a condition that can damage interiors and encourage the growth of mould. Inspectors should know how to remove efflorescence from surfaces, and educate their clients about its identification and significance.

Tuesday, 28 February 2012

What is a Home Inspection?


A home inspection is defined as a visual inspection of the readily accessible systems and components of a home and includes the determining whether systems are still performing their intended functions. The inspection and report are an invaluable service that provides you with an unbiased professional opinion of a property and can bring peace of mind when purchasing a home. The inspection is methodical and meticulous; designed to cover specific items that include:
  • Roofing
  • Exterior
  • Structure 
  • Electrical
  • Heating
  • Cooling
  • Plumbing
  • Insulation
  • Interior 
A home inspection is not technically exhaustive meaning the inspection is purely visual. It does not identify defects that cannot be seen, such as problems hidden behind walls, ceilings or floors. The inspection cannot be responsible for finding conditions that may only be visible when storage or furniture is moved. It is important for clients to understand the limitations and conditions of a home inspection. Most home inspectors will provide a written document/contract to the client before the inspection that outlines exactly what is involved with a home inspection and require it to be signed before performing the inspection. The home inspection is designed to give the client the big picture when it comes to evaluating a house. The inspector is a generalist, not a specialist and it’s best to compare a home inspector to a general medical practitioner, as they would find something wrong with a patient and then send him/her to a specialist. The specialist in our case would be an electrician, plumber, roofing contractor, HVAC contractor, engineer and so forth. You could always opt out of a traditional inspection and bring in all the expert trades to inspect your potential property, but this would be very costly and will end up costing well over a $1000. This is why the home inspection industry exists, for a much lower fee you bring in one person who has a general knowledge of all. 

You also must remember that buying a home is probably the most expensive purchase you will ever make. This is no time to shop for a cheap inspection. The cost of a home inspection is very small relative to the value of the home being inspected. The additional cost of hiring an inspector is almost insignificant by comparison.

During the inspection, the inspector will take you step by step throughout the home and gladly address any questions or concerns that you may have. By attending the inspection, you will get a better understanding of the home’s overall condition and receive many helpful maintenance tips/advice.

The actual inspection usually takes 3- 4 hours, but every house/inspection is different and can vary in time. The inspection process should never be rushed and we find that having two home inspectors during every inspection allows for a more efficient inspection without compromising quality. It also allows us to provide you with on-site reports for clients needing a quick transaction. When the inspection is done we do a property review with you and answer any outstanding questions you may have. Our inspections are unbiased neutral opinions that have no interest in whether the real estate transaction goes through.

If you would like more information, please contact us at House CSI

Saturday, 25 February 2012

InterNachi Code of Ethics


The International Association of Certified Home Inspectors (InterNACHI) promotes a high standard of professionalism, business ethics and inspection procedures. InterNACHI members subscribe to the following Code of Ethics in the course of their business.
    
I.        Duty to the Public
                     1.        The InterNACHI member shall abide by the Code of Ethics and substantially follow the InterNACHI Standards of Practice.
                     2.        The InterNACHI member shall not engage in any practices that could be damaging to the public or bring discredit to the home inspection industry.
                     3.        The InterNACHI member shall be fair, honest, impartial, and act in good faith in dealing with the public.
                     4.        The InterNACHI member shall not discriminate in any business activities on the basis of race, color, religion, sex, national origin, familial status, sexual orientation or handicap, and shall comply with all applicable federal, state and local laws concerning discrimination.
                     5.        The InterNACHI member shall be truthful regarding his/her services and qualifications.
                     6.        The InterNACHI member shall have no undisclosed conflict of interest with the client, nor shall the InterNACHI member accept or offer any undisclosed commissions, rebates, profits or other benefit, nor shall the InterNACHI member accept or offer any disclosed or undisclosed commissions, rebates, profits or other benefit from real estate agents, brokers or any third parties having financial interest in the sale of the property, nor shall the InterNACHI member offer or provide any disclosed or undisclosed financial compensation directly or indirectly to any real estate agent, real estate broker or real estate company for referrals or for inclusion on lists of preferred and/or affiliated inspectors or inspection companies.
                     7.        The InterNACHI member shall not communicate any information about an inspection to anyone except the client without the prior written consent of the client, except where it may affect the safety of others, or violates a law or statute.
                     8.        The InterNACHI member shall always act in the interest of the client, unless doing so violates a law, statute or this Code of Ethics.
                     9.        The InterNACHI member shall use a written contract that specifies the services to be performed, limitations of services, and fees.
                  10.        The InterNACHI member shall comply with all government rules and licensing requirements of the jurisdiction where he/she conducts business.
                  11.        The InterNACHI member shall not perform or offer to perform, for an additional fee, any repairs or repair-associated services to the structure on which the member or member's company has prepared a home inspection report for a period of 12 months. This provision shall not include services to components and/or systems that are not included in the InterNACHI Standards of Practice.  
    II.        Duty to Continue Education
                     1.        The InterNACHI member shall comply with InterNACHI's current Continuing Education requirements.
                     2.        The InterNACHI member shall pass the InterNACHI's Online Inspector Exam once every calendar year. 
  III.        Duty to the Profession and InterNACHI
                     1.        The InterNACHI member shall strive to improve the home inspection industry by sharing his/her lessons and/or experiences for the benefit of all. This does not preclude the member from copyrighting or marketing his/her expertise to other inspectors or the public in any manner permitted by law.
                     2.        The InterNACHI member shall assist the InterNACHI leadership in disseminating and publicizing the benefits of InterNACHI membership.
                     3.        The InterNACHI member shall not engage in any act or practice that could be deemed damaging, seditious or destructive to InterNACHI, fellow InterNACHI members, InterNACHI employees, leadership or directors.  Member(s) accused of acting or deemed in violation of such rules shall be reviewed by the Ethics committee for possible sanctions and/or expulsion from InterNACHI.
                     4.        The InterNACHI member shall abide by InterNACHI's current membership requirements.
                     5.        The InterNACHI member shall abide by InterNACHI's current message board rules.

Wednesday, 22 February 2012

Humidity!


I truly believe that a home inspection is a great opportunity to educate clients on all aspects of the home. Many things we talk about during the inspection have nothing to do with the actual findings of the inspection, but more along the lines of proper home maintenance and what to expect as a home owner. Simple things like humidity are often forgotten about or just never really understood by home owners.  This is another great article from our friends at Carson Dunlop that explains humidity in the house, and what you should know.   

The outside winter air is cold and dry. The inside winter air is dry. Our chapped lips, dry skin and static zaps from doorknobs remind us of that all season long. Homes like the dry environment, but dry air makes people uncomfortable. While an ideal humidity for homes can be as low as 5%, people prefer about 60% humidity. And because people are more powerful than homes, we add humidifiers to have it our way.

Physics 101
If we asked Einstein what he thought about humidity, he might have said, “It’s all relative”. Of course, he said that about everything. We typically talk about relative humidity rather than absolute humidity. Relative humidity is the amount of water vapour in the air relative to how much vapour the air can hold before it condenses or rains. For example, a room with 4 pints of water vapour may have a relative humidity of 40%. This means we could have 10 pints of water in the air before the relative humidity reaches 100% and we get rain or condensation.
The interesting part is that if you cool down the air in a room but add no more water vapour, the relative humidity goes up. And, if you warm the air, the relative humidity goes down. This is important because the winter air outside is very cold and dry. When we bring the winter air into our homes and warm it up, we get really dry air in our homes. For example, outdoor air with 80% relative humidity at freezing temperatures will only have 20% relative humidity when we warm it to room temperature.

Do I need a humidifier?
If your house is new, you may not have a humidifier. You may not need one because the foundation and wood framing are still drying out, releasing moisture into the air. Also, new houses are “tight”, which means the air within them hangs around for a while before being replaced by dry exterior air. It hangs around long enough to pick up moisture from things like showers, cooking, drying clothes and breathing. By comparison, old houses are drafty. Cold, dry air is creeping in all the time, drying out the home as it flushes the warm moist air out.

An oldie, but still works great!
Do I have one?
If there is a small box like the one in the picture hanging from the furnace or ductwork beside the furnace with a small electrical wire and a small water hose attached, then YES. You may also see the humidistat, a dial that looks like the thermostat but is used to control the humidity level, and is often mounted to the basement ductwork.

A humidistat.
A drum type humidifier has a tray of water with a sponge barrel or drum rotating through it. The tray is kept full with a float switch, which allows water from the house plumbing to enter the tray when the water level drops. When the humidistat is turned up or the humidity level drops, a small electric motor rotates the sponge drum through the tray, absorbing water. Some of the air moving through the duct-work blows across the sponge, picking up moisture. This moist air moves through the ducts and into the rooms.

Cascade type humidifiers have no tray of water. A small electric valve at the top controls the water supply to the humidifier. When the humidistat calls for water, the valve opens, trickling water down a honeycomb-like metal pad. Air blows across the pad, picking up moisture. Excess water is drained through a hose to a floor drain, laundry tub, or condensate pump.

What do I do?
If you have a drum style unit, the tray of sitting water is your nemesis. Ponding water will cause scale build-up and bacterial growth. Every spring, the water supply pipe valve should be turned off, the tray and sponge should be cleaned, and the humidistat should be set to OFF. In the fall, turn on the water valve, and set the humidistat to 35%. We recommend a mid-winter cleaning as well.
If you have a cascade style unit, turn off the water supply and turn the humidistat to OFF in the spring. Before use in the fall, remove and soak the pad in de-scaling solution. If it is damaged or too clogged to clean, the pad can be replaced. Once the pad is back in place, the water supply pipe valve can be turned back on, and the humidistat set to 35%. This unit will not need cleaning again until next year.

How much is too much?
As we said, people like about 60% relative humidity. Unfortunately, houses have a hard time coping with this in cold weather. Too little humidity makes people feel uncomfortable. Too much can cause condensation, mould, mildew, and rot as the warm moist air hits cool surfaces. What confuses many people is that as the weather gets colder, we have to LOWER the humidistat setting, even though we want to raise it. This is because the colder it is outside, the easier it is for condensation to form on cool surfaces like windows. We can reduce condensation by lowering the interior humidity level.
Outside
Recommended House Humidity
-20°F
15%
-20°F to -10°F
20%
-10°F to 0°F
25%
0°F to +10°F
35%
+10°F and above
40%
Summer months
Off

Keeping an eye on the amount of condensation on your windows is another great way to gauge your house humidity level. You can also track things with a room temperature and humidity monitor, available at hardware and building supply stores.


Saturday, 11 February 2012

A Typical Home Inspection Contract


Here is an example of standard home inspection contract. Pretty much all home inspection companies use a contract like this or similar and will not perform an inspection without having this signed by the client. Great info for those that don't know exactly what a home inspection is.


Limitations and Conditions of the Home Inspection:
These limitations and conditions explain the scope of your home inspection.  Please read them carefully before signing the agreement.
The purpose of your home inspection is to evaluate the general condition of a property. This includes the determining whether systems are still performing their intended functions. There are limitations to the scope of this inspection.  It provides a general overview of the more obvious repairs that may be needed.  It is not intended to be an exclusive list.  The ultimate decision of what to repair or replace is yours.  One homeowner may decide that certain conditions require repair or replacement, while another will not.

The home inspection provides you with a basic overview of the condition of the property.  Because your home inspector has only a limited amount of time to through the property, the inspection is not technically exhaustive.  Some conditions noted, such as foundation cracks or other signs of settling in a house, may either be cosmetic or may indicate a potential problem that is beyond the scope of the home inspection.  If you are concerned about any conditions noted in the home inspection report, we strongly recommend that you consult a qualified licensed contractor or engineering specialist.  These professionals can provide a more detailed analysis of any condition noted in the report at an additional cost.

A home inspection does not include identifying defects that are hidden behind walls, floors or ceilings.  This includes wiring, structure, plumbing and insulation that are hidden or inaccessible.  Some intermittent problems may not be obvious on a home inspection because they only happen under certain circumstances.  As an example, your home inspector may not discover leaks that occur only during certain weather conditions.  Home inspectors will not find conditions that may only be visible when storage or furniture is moved.  They do not remove wallpaper, look behind pictures or lift flooring (including carpet) to look underneath.

The inspection does not include hazardous materials that may be in or behind the walls, floors or ceilings of the property.  This includes building materials that are now suspected of posing a risk to health such as phenol-formaldehyde and urea-formaldehyde based products, fibreglass insulation and vermiculite insulation.  The inspector does not identify asbestos roofing, siding, wall, ceiling or floor finishes, insulation or fireproofing.  We do not look for lead or other toxic metals in such things as pipes, paint or window coverings.  The inspector does not deal with environmental hazards such as the past use of insecticides, fungicides, herbicides or pesticides.  The home inspector does not look for, or comment on, the past use of chemical termite treatments in or around the property.

We are not responsible for, and we do not comment on the quality of air in a building.  The inspector does not try to determine if there are irritants, pollutants, contaminants, or toxic materials in or around the building.  The inspection does not include spores, fungus, mould or mildew, including that which may be present behind walls or under floors.  You should note that whenever there is water damage noted in the report, there is a possibility that mould or mildew may be present, unseen behind a wall, floor or ceiling.

The home inspector does not look for and is not responsible for fuel oil, septic or gasoline tanks that may be buried on the property.  If fuel oil or other storage tanks remain on the property, you may be responsible for their removal and the safe disposal of any contaminated soil.  If you suspect there is a buried tank, we strongly recommend that you retain a qualified Environmental Consultant to determine whether this is a potential problem.
We will have no liability for any claim or complaint if the conditions have been disturbed, altered, repaired, replaced or otherwise changed before we have a reasonable period of time to investigate.
I have read, understood and accepted the above Limitations and Conditions of this home inspection.

Signed: ____________________________________________________________ Date: ___________________________

Windows

This is just a quick post about window installations.  These photos are from a reno-inspection and as you can see the trim is not installed, which allows us to see how the contractor installed these windows and the products he used.

Nicely Done!
This contractor used a roofing product called ‘Ice & Water Shield’ to wrap the framing of the window opening.  This product is generally used on roofs as an underlay for the first 36” of your roof; designed to protect against ice damning and the damage it causes.  It’s a great product and works great to protect the framing around your windows. 

The sill. Where most moisture problems occur.

Ice & Water Shield.
The building code states that you only need to use 6mm poly (standard vapour barrier) on the sill and sides of the framing.  Its good practice to consider the building code as a set of minimum standards, there’s no reason why you can’t exceed those minimums. 

Anyhow, I figured I share these photos....On most home inspections we cannot see behind the finished trim and there is no way to know exactly how the windows were installed as far as the products used.

House CSI

Monday, 6 February 2012

Three Deadly Mistakes Every Home Buyer Should Avoid


This is a great article from InterNachi that is great for anyone thinking about purchasing a house!

Deadly Mistake #1: Thinking you can't afford it. 
  
Many people who thought that buying the home they wanted was simply out of their reach are now enjoying a new lifestyle in their very own homes.  Buying a home is the smartest financial decision you will ever make.  In fact, most homeowners would be broke at retirement if it wasn't for one saving grace -- the equity in their homes.  Furthermore, tax allowances favour home ownership. 

Real estate values have always risen steadily.  Of course, there are peaks and valleys, but the long-term trend is a consistent increase.  This means that every month when you make a mortgage payment, the amount that you owe on the home goes down and the value typically increases.  This "owe less, worth more" situation is called equity build-up and is the reason you can't afford not to buy. 
  
Even if you have little money for a down payment or credit problems, chances are that you can still buy that new home.  It just comes down to knowing the right strategies, and working with the right people.  See below. 
  
Deadly Mistake #2: Not hiring a buyer's agent to represent you. 

Buying property is a complex and stressful task.  In fact, it is often the biggest, single investment you will make in your lifetime.  At the same time, real estate transactions have become increasingly complicated.  New technology, laws, procedures, and competition from other buyers require buyer agents to perform at an ever-increasing level of competence and professionalism.  In addition, making the wrong decisions can end up costing you thousands of dollars.  It doesn't have to be this way! 

Work with a buyer's agent who has a keen understanding of the real estate business and the local market.  A buyer's agent has a fiduciary duty to you.  That means that he or she is loyal only to you and is obligated to look out for your best interests.  A buyer's agent can help you find the best home, the best lender, and the best home inspector in your area.  That inspector should be an InterNACHI-certified home inspector because InterNACHI inspectors are the most qualified and best-trained inspectors in the world.
Trying to buy a home without an agent or a qualified inspector is, well... unthinkable. 

Deadly Mistake #3: Getting a cheap inspection. 
  
Buying a home is probably the most expensive purchase you will ever make.  This is no time to shop for a cheap inspection.  The cost of a home inspection is small relative to the value of the home being inspected.  The additional cost of hiring a certified inspector is almost insignificant by comparison.  As a home buyer, you have recently been crunching the numbers, negotiating offers, adding up closing costs, shopping for mortgages, and trying to get the best deals.  Don't stop now!  Don't let your real estate agent, a "patty-cake" inspector, or anyone else talk you into skimping here.  

InterNACHI front-ends its membership requirements.  InterNACHI turns down more than half the inspectors who want to join because they can't fulfill the membership requirements. 
InterNACHI-certified inspectors perform the best inspections, by far.  InterNACHI-certified inspectors earn their fees many times over.  They do more, they deserve more and -- yes -- they generally charge a little more.  Do yourself a favour...and pay a little more for the quality inspection you deserve.


Wednesday, 1 February 2012

Cabinet Drawers and Slides


The kitchen is an important aspect to the home inspection process and is usually a top priority for our clients.  The kitchen is the hub of a home and is where most families spend the majority of their time.  This post will focus on the different types of drawers and drawer slides found in common North American kitchens and how they compare with each other.  

Drawers in lower cabinets improve both accessibility and usable storage volume of the cabinet. Materials and construction vary considerably depending on the quality and price of the kitchen. Melamine on particle board sides usually with nailed corners are commonly used in mass produced kitchens. These are the least expensive available and are normally used with roller & track or side mount slides. This combination allows the drawer to be pulled out only part way from the cabinet leaving approximately one quarter of the drawer hidden in the cabinet. Most slide manufacturers will provide full extension slides at a slightly higher price.  Full extension slides allow the drawer to fully extend beyond the cabinet and make the rear of the drawer more accessible.
Side mount slides.

Standard roller & track style slides.


A step above the melamine/particle board drawer is a Russian/Baltic birch drawer.  These are also nailed together and are commonly built using dado construction.  These drawers can be used with roller & track style slides, side mount slide and under mount European style slides.

Russian/baltic birch drawer with European under mount slides.
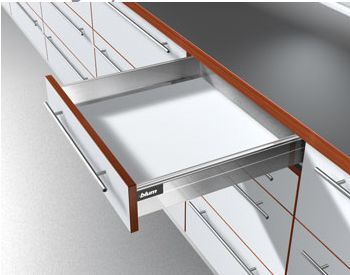
European drawer design has evolved using metal and plastic and since 1990 have become increasingly popular in North America. German innovation has brought about a different breed of drawers with space saving full extension under mount self closing non slamming push to close push to open mechanisms. Some of these are available integrated into the sides of the drawer to make an easily cleaned smooth faced combined drawer slide and drawer side.

European style drawers. 'Blum tandem box'
However the most durable drawer design is still the traditional dovetail jointed hardwood drawer. Most bespoke cabinet making companies now offer these drawers with the European under mount slide systems providing durability and function.  

Dovetail drawer with soft close under mount slides.
Another popular feature in a kitchen is a full height pantry cabinet with a combination of upper shelves and lower drawers up to almost eye level that gives much better access to items at the back of the cabinet.

Pantry with dovetail drawers on under mount slides.
Drawers may not seem to be that important to the home inspection process or the overall look of the kitchen, but they are an integral part to the overall function of the kitchen.  Considering the amount of time families spend in the kitchen, we believe having properly functioning drawers is just as important as the look of your kitchen. 


Sunday, 22 January 2012

Home Inspection Costs

How much should a home inspection cost? This is an ongoing question and usually the first question realtors and prospective clients ask when considering our services.  

You must remember that buying a home is probably the most expensive purchase you will ever make. This is no time to shop for a cheap inspection. The cost of a home inspection is very small relative to the value of the home being inspected. The additional cost of hiring an inspector is almost insignificant by comparison.

The home inspector’s job is to provide a general, overall inspection of the home. We can consider ourselves similar to a general medical practitioner, as they would find something wrong with a patient and then send him/her to a specialist. The specialist in this case would be an electrician, plumber, roofing contractor, HVAC contractor, engineer and so forth.

You could always opt out of a traditional inspection and bring in all the expert trades to inspect your potential property, but the cost would be ridiculous! You would end up spending well over a $1000 to do this. This is why the home inspection industry exists, for a much lower fee you bring in one person who has a general knowledge of all.

You also want to make sure your home inspector is well qualified and really does know what they are doing. Do yourself a favour and pay a little more for the quality inspection you deserve.  Our prices vary for each property we inspect, don't be fooled by inexperienced inspectors offering cheap inspections.  True professionals take their job seriously and amateurs DO NOT! 
Like most things in life, you pay for what you get! 

House CSI