Just a little reminder on how important it is to do your homework when choosing your next home inspector. Do your own research and choose wisely as there is a lot of choice out there!
‘Quality Home Inspections by Inspectors who have actually built homes!’
This is our slogan/motto and something that we are very proud of!
You would be surprised to know that most home inspection companies have inspectors working for them that have never actually built homes. To us that sounds absolutely crazy and something that you want to know before putting your trust within that person/company.
If we can suggest anything to potential clients, it would be to find out what your home inspector did before they became a ‘home inspector’. Hire someone you are comfortable with and get yourself the quality home inspection you deserve on what will likely be the most expensive purchase of your life.
Please visit House CSI for more info. Feel free to contact us anytime.

Justin Boyce is a certified home inspector and co-owner of House CSI located in Toronto, ON. 'The Home Inspector' serves to educate you on your greatest investment and the perils associated with buying and selling homes.
Friday, 1 March 2013
Wednesday, 20 February 2013
Inspecting Brick Houses

We all know how common brick houses are in here in Ontario, but what most people in Ontario don't realize is that there are two very different types of brick houses, brick veneer and solid masonry. Here is a wonderful article that help clarifies the differences between the two types. Enjoy!
Solid Masonry
Solid masonry construction is also called ‘Solid Brick', ‘Double Brick', and sometimes ‘Brick and Block'. In its most common form, a solid masonry wall consists of an outer layer of brick and an inner layer of brick (a layer of brick is called a ‘wythe' in masonry circles).
The reason why solid masonry is a more accurate description than solid brick or double brick is because the inner wythe may not be brick. Because the inner wythe will never be seen, concrete or cinder block is sometimes substituted for brick.
As a brick wall increases in height, there is more and more danger that the inner wythe will separate from the outer wythe. To hold the two wythe's together, header bricks are installed, usually every six rows. From the outside, header bricks look like regular bricks except they are shorter. In reality, they are the same size as a normal brick, however they are installed sideways so that the end of the brick is visible from the exterior of the building. The header bricks act as a bridge between the outer wythe and the inner wythe and prevent the two from separating.
Therefore, most solid masonry walls display header bricks in every 6th row or course. Sometimes, every brick in the course is a header brick, however there are a number of common patterns. It is not unusual to see two long bricks followed by two short ones then two long ones then two short ones. (The long bricks, by the way, are called stretchers.) Sometimes bricks are installed over windows with their long face parallel to the wall but the brick standing on its end. These are called soldiers.
It is possible to build a solid masonry wall using metal ties to hold the two wythes of masonry together. When this is done, no header bricks will be visible and the wall can easily be mistaken for a brick veneer wall.
So What's so Good About a Solid Masonry Wall?
There is no question that the big bad wolf will find this wall the hardest to blow down. Structurally, solid masonry walls are very strong and can, if properly maintained, provide hundreds of years of service.

What is Brick Veneer?
If solid masonry is so good, why is it that most brick houses built in the last 30 years are brick veneer construction?
Firstly, we have to understand the difference between brick veneer and solid masonry. The biggest difference is that with solid masonry, the brick is holding up the house. With brick veneer, the house is holding up the brick!
When we say brick veneer, we don't mean those little thin slices that you glue on your kitchen wall. We mean an honest to goodness brick. However, the wall is only one wythe thick. Behind the brick veneer is a wood frame wall which is actually holding up the house. The brick veneer is, in effect, siding!
Insulation
Brick veneer became the norm when building codes began to require insulation in the exterior walls. One of the best insulators is air. Most good insulation does nothing but trap air; that's why most insulations are light and fluffy. Brick is not exactly light and fluffy. Therefore it's not really a very good insulator. A brick veneer house then, is really a wood frame house where the cavity between the studs in the wall can be insulated.
The walls are built, covered with sheathing and often insulated before the brick is even installed. As the brick is being installed, metal ties are nailed onto the wood frame wall. It is important that they be nailed into the studs and not just into the sheathing. The metal ties are then bent so that they are horizontal where they become imbedded in the mortar joints as the brick veneer wall is constructed. The brick veneer is built on the outer edge of the foundation wall so that a one inch air space remains between the brick veneer and the sheathing.
How Waterproof Is Brick?
The short answer is "not very". With a wind driven rain, moisture will pass right through a brick wall. The one inch air space behind the brick allows this water to run down the back surface of the brick. At the bottom of the wall cavity, a plastic or metal flashing collects the water and allows it to drain out through weep holes. You'll find weep holes spaced at approximately 32" (every fourth brick) along the top of foundation walls and above doors and windows.
Not only do the weep holes let the water drain out of the wall, but they also allow the wind to get behind the brick and pressurize the one inch airspace between the back of the brick and the sheathing. Believe it or not, this extra air pressure reduces the amount of rain that gets forced through the wall.

So Which is Better?
Well that depends on your criteria. Solid masonry walls are certainly stronger; however brick veneer walls are plenty strong and are certainly better insulated. In the big scheme of things, the differences between the two types of construction should not be important enough to affect a purchase decision. Always use a qualified, trusted home inspector to help give you all the necessary information so you can make the right decision.
House CSI
Firstly, we have to understand the difference between brick veneer and solid masonry. The biggest difference is that with solid masonry, the brick is holding up the house. With brick veneer, the house is holding up the brick!
When we say brick veneer, we don't mean those little thin slices that you glue on your kitchen wall. We mean an honest to goodness brick. However, the wall is only one wythe thick. Behind the brick veneer is a wood frame wall which is actually holding up the house. The brick veneer is, in effect, siding!
Insulation
Brick veneer became the norm when building codes began to require insulation in the exterior walls. One of the best insulators is air. Most good insulation does nothing but trap air; that's why most insulations are light and fluffy. Brick is not exactly light and fluffy. Therefore it's not really a very good insulator. A brick veneer house then, is really a wood frame house where the cavity between the studs in the wall can be insulated.
The walls are built, covered with sheathing and often insulated before the brick is even installed. As the brick is being installed, metal ties are nailed onto the wood frame wall. It is important that they be nailed into the studs and not just into the sheathing. The metal ties are then bent so that they are horizontal where they become imbedded in the mortar joints as the brick veneer wall is constructed. The brick veneer is built on the outer edge of the foundation wall so that a one inch air space remains between the brick veneer and the sheathing.
How Waterproof Is Brick?
The short answer is "not very". With a wind driven rain, moisture will pass right through a brick wall. The one inch air space behind the brick allows this water to run down the back surface of the brick. At the bottom of the wall cavity, a plastic or metal flashing collects the water and allows it to drain out through weep holes. You'll find weep holes spaced at approximately 32" (every fourth brick) along the top of foundation walls and above doors and windows.
Not only do the weep holes let the water drain out of the wall, but they also allow the wind to get behind the brick and pressurize the one inch airspace between the back of the brick and the sheathing. Believe it or not, this extra air pressure reduces the amount of rain that gets forced through the wall.
So Which is Better?
Well that depends on your criteria. Solid masonry walls are certainly stronger; however brick veneer walls are plenty strong and are certainly better insulated. In the big scheme of things, the differences between the two types of construction should not be important enough to affect a purchase decision. Always use a qualified, trusted home inspector to help give you all the necessary information so you can make the right decision.
House CSI
Saturday, 16 February 2013
Ice Dams!

Winter can be a beautiful thing! Just look at all those spectacular icicles hanging off the roofs around your neighbourhood. They may look pretty, but those icicles can mean trouble for your home. So why exactly do icicles form at the roof edge? And what is really going on to cause this occurrence.
What is an Ice Dam?
An ice dam is a ridge of ice that forms at the edge of a roof and prevents melting snow from draining. As water backs up behind the dam, it can leak through the roof and cause damage to walls, ceilings, insulation and other areas.
How do ice dams form?
How do ice dams form?

Ice dams are formed by an interaction between snow cover, outside temperatures, and heat lost through the roof. Specifically, there must be snow on the roof, warm portions of the upper roof, and cold portions of the lower roof (at freezing or below). Melted snow from the warmer areas will refreeze when it flows down to the colder portions, forming an ice dam.
Although the primary contributor to snow melting is heat loss from the building's interior, solar radiation can also provide sufficient heat to melt snow on a roof. For example, in southern Canada, enough sunlight can be transmitted through 6 inches of snow cover on a clear and sunny day to cause melting at the roof's surface even when the outside temperature is -10° C, with an attic temperature of -5° C.
Gutters do not cause ice dams to form, contrary to popular belief. Gutters do, however, help concentrate ice from the dam in a vulnerable area, where parts of the house can peel away under the weight of the ice and come crashing to the ground.
Problems caused by Ice Dams:
Gutters do not cause ice dams to form, contrary to popular belief. Gutters do, however, help concentrate ice from the dam in a vulnerable area, where parts of the house can peel away under the weight of the ice and come crashing to the ground.
Problems caused by Ice Dams:
- Ice dams are problematic because they force water to leak from the roof into the building envelope. This may lead to:
- Rotted roof decking, exterior and interior walls, and framing;
- Respiratory illnesses (allergies, asthma, etc.) caused by mold growth;
- Reduced effectiveness of insulation. Wet insulation doesn’t work well, and chronically wet insulation will not decompress even when it dries. Without working insulation, even more heat will escape to the roof where more snow will melt, causing more ice dams which, in turn, will lead to leaks; and
- Peeling paint. Water from the leak will infiltrate wall cavities and cause paint to peel and blister. This may happen long after the ice dam has melted and thus not appear directly related to the ice dam.
- Keep the entire roof cold. This can be accomplished by implementing the following measures:
- Install a metal roof. Ice formations may occur on metal roofs, but the design of the roof will not allow the melting water to penetrate the roof's surface. Also, snow and ice are more likely to slide off of a smooth, metal surface than asphalt shingles.
- Seal all air leaks in the attic floor, such as those surrounding wire and plumbing penetrations, attic hatches, and ceiling light fixtures leading to the attic from the living space below.
- Increase the thickness of insulation on the attic floor, duct-work, and chimneys that pass through the attic.
- Move or elevate exhaust systems that terminate just above the roof, where they are likely to melt snow.
- A minimum of 3" air space is recommended between the top of insulation and roof sheathing in sloped (cathedral) ceilings.
- Remove snow from the roof. This can be accomplished safely using a roof rake from the ground. Be careful not to harm roofing materials or to dislodge dangerous icicles.
- Create channels in the ice by hosing it with warm water. Because this process intentionally adds water to the roof, this should be done only in emergencies where a great deal of water is already flowing through the roof, and when temperatures are warm enough that the hose water can drain before it freezes.
Please contact House CSI for more info!
Sunday, 3 February 2013
Knob & Tube Wiring
Knob-and-tube (K&T) wiring was an early standardized method of electrical wiring in buildings, in common use in North America from about 1880 to the 1940's. The system is considered obsolete and can be a safety hazard, although some of the fear associated with it is undeserved.

It requires two wires (normally a black one and a white one) to create a circuit. With modern wiring, these two wires (along with a ground wire) are bundled together in a single plastic sheathing. Older knob and tube wiring was installed so that the black wire and the white wire ran separately. It was installed in houses up until about 1950. Modern wiring runs directly through holes in the structural components (such as floor joists). Knob and tube wiring used protective ceramic tubes placed in the holes to prevent the wire from chafing against the woodwork. Modern wiring uses staples to hold the wiring against structural members.
Knob and tube wiring used more elaborate ceramic knobs to clamp the wire to the structural member. Connections between modern wires are completed within enclosed junction boxes. Knob and tube wiring had visible connections. The wires were spliced and soldered together and then wrapped with electrical tape. Ceramic knobs were used to secure the wires so that anyone inadvertently tugging on the wire would not be tugging on the electrical connection. Modern wiring is typically #14 gauge copper wire and capable of handling 15 amps. Knob and tube wiring is often #12 gauge copper wire and can handle 20 amps. Note: Even though some knob and tube wiring is capable of handling 20 amps, we suggest that it be protected by 15 amp fuses because, in all likelihood, some modern #14 gauge wire may be connected to the older #12 gauge wiring.
From the above description, it becomes pretty obvious that knob and tube wiring is not necessarily dangerous. Knob and tube wiring which was installed properly, and has not been abused, can provide many more years of service. The biggest problem with knob and tube wiring has nothing to do with the original wiring. It has everything to do with what has happened after the fact.
Most old houses do not have as many electrical circuits as new houses. If a circuit became overtaxed and 15 amp fuses were constantly blowing, some ill informed home owners would put in 25 or 30 amp fuses to “solve” the problem. Allowing 25 or 30 amps to flow through a wire which was not intended to handle that much electricity, causes the wire to overheat. This can cause the wire and the insulation to become brittle. Some home owners also decided to add additional outlets in the house and tie the new outlets into the old wiring. Instead of making proper connections which are soldered and appropriately protected, many home owners did their own sub-standard work. They would get out the pliers and a paring knife and whittle away at the wires until a connection was made. Instead of wrapping the connection with proper electrical tape, they used hockey tape, masking tape, scotch tape or even band-aids. It is wiring that has been abused that is potentially dangerous. Knob and tube wiring, on its own, is not inherently a problem. Some would argue that knob and tube wiring does not have a ground conductor. We would remind them that even modern wiring installed between 1950 and 1960 does not have a ground conductor.
A ground conductor is necessary if you are plugging in appliances that have a 3-prong plug. If however, the knob and tube wiring is restricted to bedrooms, living room, dining room, et cetera, this creates no special hazard. Plugging a two prong lamp, TV, or clock into an old two prong outlet is just as safe as plugging them into a grounded outlet.
K&T Wiring and Insurance:
Many insurance companies refuse to insure houses that have knob-and-tube wiring due to the risk of fire. Exceptions are sometimes made for houses where an electrical contractor has deemed the system to be safe.
Advice for those with K&T wiring:
- Have the system evaluated by a qualified electrician. Only an expert can confirm that the system was installed and modified correctly.
- Do not run an excessive amount of appliances in the home, as this can cause a fire.
- Where the wiring is brittle or cracked, it should be replaced. Proper maintenance is crucial.
- K&T wiring should not be used in kitchens, bathrooms, laundry rooms or outdoors. Wiring must be grounded in order to be used safely in these locations.
- Rewiring a house can take weeks and cost thousands of dollars, but unsafe wiring can cause fires, complicate estate transactions, and make insurers skittish.
- Homeowners should carefully consider their options before deciding whether to rewire their house.
- The homeowner or an electrician should carefully remove any insulation that is found surrounding K&T wires.
- Prospective home buyers should get an estimate of the cost of replacing K&T wiring. They can use this amount to negotiate a cheaper price for the house.
In summary, knob-and-tube wiring is likely to be a safety hazard due to improper modifications and the addition of building insulation. Inspectors need to be wary of this old system and be prepared to inform their clients about its potential dangers.

Saturday, 26 January 2013
Synthetic Stucco (EIFS)
EIFS stands for Exterior Insulating and Finishing Systems. It is sometimes referred to as Synthetic Stucco. Its use increased sharply in the 1990s. In North America about 300, 000 homes have an EIFS exterior.
We care because EIFS has been connected to concealed rot in wall cavities.
What Exactly Is It?
There are many different systems offered by various manufacturers, but in general EIFS wall systems consist of a wood frame wall covered with a sheathing such as plywood, or even gypsum board. Plastic foam insulation boards are glued or fastened to the sheathing. A 1/16- to 1/4- inch-thick base coat is troweled on to the insulation. A glass fiber reinforcing mesh is imbedded in the base coat. Finally, a finished coat is sprayed, troweled or rolled on. This finish coat provides the color and texture.
Many installations have no building paper or housewrap behind the stucco to act as a backup material.
What Is Happening
Rain water appears to be getting into the wall systems through imperfections in the stucco. These include joints around windows and doors and penetrations from railings, wiring, plumbing, vents, etc. Once water gets behind the system it gets trapped, leading to mold, mildew and rot of the sheathing, studs, flooring and other framing members. EIFS houses often look good until sections of the wall are removed revealing concealed damage. The damage can take place within the first few years of the home's life.
As most of the damage has been found in houses in coastal areas, some have suggested that condensation is a problem; however, since the most severe damage seems to show up around wall penetrations, condensation does not appear to be the culprit. The worst damage is often found below and beside windows.
Solutions
There is little that can be done on existing systems short of re-siding or paying fanatical attention to keeping the water out. Caulking and flashing maintenance should be a high priority for people with synthetic stucco houses.
In the very newest installations, contractors are using building paper or housewrap behind the insulation to protect the sheathing. In addition, the newest installations are designed with a drainage system behind the insulation to allow any water which does get in, to drain out. This is not unlike the drainage system found in a brick veneer home. These improvements should work but only if they are well constructed.
So far we know that areas of high rain fall, and particularly areas with rain accompanied by wind, result in houses with the most damage. Homes which have no roof overhang or very small overhang or many penetrations through the wall systems are also at risk.
Unfortunately, a visual inspection cannot tell the whole story, and until invasive testing becomes standardized and sufficient data becomes available for our area, concealed damage in synthetic stucco houses will remain a question mark.
Friday, 18 January 2013
Carbon Monoxide
WHAT IS CARBON MONOXIDE?
CO is a colorless, odorless, tasteless gas.
It is a by-product of incomplete combustion (un-burned fuel such as gas, oil, wood, etc.)
Low concentrations of CO can go undetected and can contribute to ongoing, unidentified illnesses. At high concentrations, it can be deadly.
WHY IS IT DANGEROUS?
If there is CO in the air you breath, it will enter your blood system the same way oxygen does, through your lungs. The CO displaces the oxygen in your blood, depriving your body of oxygen. When the CO displaces enough oxygen, you suffocate.
WHAT ARE THE SYMPTOMS?
· Confusion
· Cardiac Problems
· Brain Damage
· Severe Headaches
· Breathing Difficulties
· Dizziness
· Death
WHAT CAN PRODUCE CO IN OUR HOMES?
Anything that burns fuel or generates combustion gases including:
· Gas Stoves
· Fireplaces
· Automobiles
· BBQ
· Furnaces
· Ranges
· Boilers
· Space Heaters
Solid fuels, such as wood, always produce carbon monoxide when they are burned. Gas and liquid fuels may produce no CO or very little.
WHAT ARE THE MOST COMMON SOURCES OF CARBON MONOXIDE?
1. Automobile exhaust in attached garages
This is responsible for 60% of all CO alarms. People who warm their cars up in the garage are trapping CO inside the garage. The CO can find its way into the home.

2. Gas cooking appliances
Reported to account for 20% of CO alarms.
May be a result of a misused, poorly
maintained, poorly installed, or unvented
cooking appliance.


3. Poor draft/venting for fuel burning appliances -
This is one of the most common and serious causes for CO build up and has been reported to account for up to 19% of CO alarms. The products of combustion are not being safely expelled to the exterior. This could be due to venting problems, such as blocked chimney flues or inadequate venting for appliances or fireplaces. Other problems include poor installation and negative air pressure in the house, causing backdrafting, often due to exhaust fans.
Other problems include:
Poor combustion at furnace
Inadequate combustion air to the furnace can result in incomplete combustion. If the furnace has a cracked heat exchanger, it is possible to get CO into the circulating air. It is also imperative that we do not deprive our heating equipment and fuel burning appliances of air; especially in air-tight homes where running exhaust fans can result in a shortage of combustion air. Combustion air is essential for safe operation of furnaces, water heaters, and other fuel burning equipment.
Leakage -
A leak in a chimney or flue pipe.


Ventilation -
Barbecues or gasoline powered equipment operating in a attached garage, basement,
or enclosed area.
Are there more problems with carbon monoxide today than 30 years ago?
Yes, due to -
More energy-efficient, air-tight homes
Less natural ventilation
How can I guard against carbon monoxide poisoning?
The first line of defense is to have your home heating systems, fuel burning appliances, flues and chimneys checked and/or cleaned annually.
CONCLUSIONS
CO detectors are designed to protect the average healthy human from death or serious injury under the current standards; however - People who are more susceptible cannot depend on these devices for total protection. In this case, more sensitive CO detecting equipment should be used.
Several groups are working with UL to improve the standards. October 99 revisions have already been drafted. There is room for improvement by imposing stricter standards as well as technological development.
It is critical that people understand the dangers of CO and that the people who investigate it are properly trained and are using CO testing equipment properly.
Where to install a CO detector?
It is critical that people understand the dangers of CO and that the people who investigate it are properly trained and are using CO testing equipment properly.
Where to install a CO detector?
One or more CO detectors in accordance with the manufacturer's recommendations. Usually one per floor.
Maintain and test regularly as instructed by the manufacturer.
Cheers to Carson Dunlop for providing us with this valuable information! For more information please contact your leading Toronto home inspection firm.
Maintain and test regularly as instructed by the manufacturer.
Cheers to Carson Dunlop for providing us with this valuable information! For more information please contact your leading Toronto home inspection firm.
Thursday, 3 January 2013
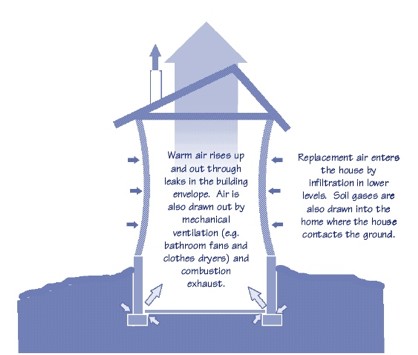
Radon Gas
Radon is a cancer-causing, radioactive gas.
You cannot see, smell or taste radon. But it still may be a problem in your home. When you breathe air containing radon, you increase your risk of getting lung cancer. In fact, the Surgeon General of the United States has warned that radon is the second leading cause of lung cancer in the United States today. If you smoke and your home has high radon levels, your risk of lung cancer is especially high. Radon is a radioactive gas that has been found in homes all over the United States & Canada. It comes from the natural breakdown of uranium in soil, rock and water, and gets into the air you breathe. Radon typically moves up through the ground to the air above, and into your home through cracks and other holes in the foundation. Radon can also enter your home through well water. Your home can trap radon inside. Any home can have a radon problem, including new and old homes, well-sealed and drafty homes, and homes with or without basements. In fact, you and your family are most likely to get your greatest radiation exposure at home. That is where you spend most of your time.
Nearly one out of every 15 homes in the United States is estimated to have an elevated radon level (4 pCi/L or more). Elevated levels of radon gas have been found in homes in your state.
The EPA Recommends:
Test for Radon
Having your home tested is the best way to find out if you have high radon levels. The EPA and the Surgeon General recommend testing all homes below the third floor for radon. If you find that you have high radon levels, there are ways to fix a radon problem. Even very high levels can be reduced to acceptable levels.
Selling your Home?
The EPA recommends that you test your home before putting it on the market and, if necessary, lower your radon levels. Save the test results and all information you have about steps that were taken to fix any problems. This could be a positive selling point.
Buying a Home?
The EPA recommends that you know what the indoor radon level is in any home you are considering buying. Ask the seller for their radon test results. If the home has a radon-reduction system, ask the seller for information they have about the system. If the home has not yet been tested, you should have the house tested.
If you are having a new home built, there are features that can be incorporated into your home during construction to reduce radon levels.
These radon testing guidelines have been developed specifically to deal with the time-sensitive nature of home purchases and sales, and the potential for radon device interference. These guidelines are slightly different from the guidelines in other EPA publications which provide radon testing and reduction information for non-real estate situations.
This guide recommends three short-term testing options for real estate transactions. The EPA also recommends testing a home in the lowest level which is currently suitable for occupancy, since a buyer may choose to live in a lower area of the home than that used by the seller.

Contact us for more information.

You cannot see, smell or taste radon. But it still may be a problem in your home. When you breathe air containing radon, you increase your risk of getting lung cancer. In fact, the Surgeon General of the United States has warned that radon is the second leading cause of lung cancer in the United States today. If you smoke and your home has high radon levels, your risk of lung cancer is especially high. Radon is a radioactive gas that has been found in homes all over the United States & Canada. It comes from the natural breakdown of uranium in soil, rock and water, and gets into the air you breathe. Radon typically moves up through the ground to the air above, and into your home through cracks and other holes in the foundation. Radon can also enter your home through well water. Your home can trap radon inside. Any home can have a radon problem, including new and old homes, well-sealed and drafty homes, and homes with or without basements. In fact, you and your family are most likely to get your greatest radiation exposure at home. That is where you spend most of your time.
Nearly one out of every 15 homes in the United States is estimated to have an elevated radon level (4 pCi/L or more). Elevated levels of radon gas have been found in homes in your state.
The EPA Recommends:
- If you are buying a home or selling your home, have it tested for radon.
- For a new home, ask if radon-resistant construction features were used and if the home has been tested.
- Fix the home if the radon level is 4 picoCuries per liter (pCi/L) or higher.
- Radon levels less than 4 pCi/L still pose a risk, and in many cases, may be reduced.
- Take steps to prevent device interference when conducting a radon test.
Test for Radon
Having your home tested is the best way to find out if you have high radon levels. The EPA and the Surgeon General recommend testing all homes below the third floor for radon. If you find that you have high radon levels, there are ways to fix a radon problem. Even very high levels can be reduced to acceptable levels.
Selling your Home?
The EPA recommends that you test your home before putting it on the market and, if necessary, lower your radon levels. Save the test results and all information you have about steps that were taken to fix any problems. This could be a positive selling point.
Buying a Home?
The EPA recommends that you know what the indoor radon level is in any home you are considering buying. Ask the seller for their radon test results. If the home has a radon-reduction system, ask the seller for information they have about the system. If the home has not yet been tested, you should have the house tested.
If you are having a new home built, there are features that can be incorporated into your home during construction to reduce radon levels.
These radon testing guidelines have been developed specifically to deal with the time-sensitive nature of home purchases and sales, and the potential for radon device interference. These guidelines are slightly different from the guidelines in other EPA publications which provide radon testing and reduction information for non-real estate situations.
This guide recommends three short-term testing options for real estate transactions. The EPA also recommends testing a home in the lowest level which is currently suitable for occupancy, since a buyer may choose to live in a lower area of the home than that used by the seller.
 |
| Radon Mitigation System. |
Subscribe to:
Posts (Atom)